The Best Fluffy Pancakes recipe you will fall in love with. Full of tips and tricks to help you make the best pancakes.
Look—every hour you’re grinding away in some fluorescent-lit gym is an hour you’re NOT on the bike. And that’s the brutal truth nobody wants to admit when they’re posting their squat PRs on Strava (which, let’s be honest, means absolutely nothing for your climbing ability).
The real issue with most cycling leg strength programs? It’s not effort. God knows cyclists will suffer through anything. The problem is efficiency—or the complete lack of it. You’ve got riders doing generic bodybuilding splits that some Instagram influencer recommended, excessive volume on movements that have zero carryover to actual pedaling mechanics, absolutely no understanding of force application angles… and they’re wasting like 60-70% of their strength training time. Maybe more. Building muscle that looks good but doesn’t make you faster.
This guide cuts that waste—no, eliminates it entirely. The five exercises we’re covering (Ankle Isometric Holds on Leg Press with mid-foot positioning, Single-Leg Leg Press with Pause at 90°, Split-Stance Trap Bar Deadlift done light and explosive, Heavy Seated Calf Raise with slow eccentrics, and Slant Board Squats at slow tempo) represent what I’d call a surgical approach to leg strength cycling development. Each one targets specific weaknesses in your pedal stroke, addresses the force production angles you actually use when racing… not when you’re posing in front of a mirror.
The strategies below? They show you how to implement these movements for maximum return. Minimal time wasted.
Strategy 1: Angle-Specific Loading—Because You Don’t Pedal at Full Squat Depth
Here’s what everyone gets wrong: Cyclists walk into gyms and do bilateral squats with full range of motion, spending equal time in positions they literally never experience while riding. Think about it. You don’t pedal at full knee extension (that would be terrible biomechanics) and you’re definitely not down in a deep squat position. You operate in that 90-120° knee flexion sweet spot during the power phase where watts actually happen.
The smarter approach: Lock in your training at cycling-relevant joint angles. Period.
Single-Leg Leg Press with Pause at 90°
Just… it eliminates the fluff. The pause right at 90° knee flexion specifically targets—and I mean specifically—the exact angle where you’re producing peak power during the pedal downstroke. When you hold that position for 2-3 seconds you’re forcing motor unit recruitment patterns that actually transfer to the bike, not to your ability to stand up from a chair (which, fine, is useful when you’re 80, but you’re trying to race bikes right now).
Here’s how you program it:
- 3-4 sets per leg
- 6-8 reps with that pause (don’t cheat it)
- 2-3x per week during base phase when you’ve got recovery capacity
- Load should be 70-80% of what you’d use for continuous reps without the pause
The unilateral aspect? That addresses bilateral deficit. Which is this weird phenomenon where cyclists often produce less power with both legs working together than the sum of each leg individually. Makes no sense until you realize we’ve trained our bodies into this dysfunction through thousands of hours of circular pedaling. This exercise fixes it while building stability through hip and knee joints during single-leg loading.
Real-world example: There’s this Cat 2 road racer I know (won’t name him because he doesn’t want his competitors knowing his secrets—smart guy) who increased FTP by 28 watts over just 12 weeks using paused single-leg press twice weekly. And he maintained his cycling volume. The strength didn’t just show up in testing, it showed up when it mattered—he held 340 watts for 20 minutes at 68kg bodyweight (5.0 W/kg), up from 4.6 W/kg. That’s not marginal. That’s podium-level improvement.
Strategy 2: Velocity-Specific Development—Match Your Training Speed to How You Actually Race
The mistake everyone makes: Lifting heavy weights slowly builds maximum strength, sure. But cycling? Cycling requires rapid force production. Your peak cadence in sprints hits 130-140 RPM—that’s chaotic, violent force application. Climbing out of the saddle demands explosive power at 60-80 RPM. Grinding through heavy training loads at like 30-40 seconds per rep… that doesn’t prepare your nervous system for any of this. You’re training the wrong energy system, wrong speed, wrong everything.
The fix: Integrate explosive, submaximal loading.
Split-Stance Trap Bar Deadlift (light + fast)
It bridges the gap—and I love this exercise, by the way—between pure strength and power application. You’re using 40-50% of your max deadlift, so it feels light, but you’re driving through the movement at maximum velocity. Explosive. The split stance mimics (somewhat) the asymmetrical loading of the pedal stroke, and the trap bar allows vertical force production that’s similar to when you’re standing on climbs, yanking the bike side to side.
Programming looks like:
- 4-6 sets of 3-5 reps
- Rest 2-3 minutes between sets (full recovery, this isn’t CrossFit)
- Move the weight as explosively as possible—like you’re trying to throw it through the ceiling
- Implement during build and peak phases when you need power, not just strength
The rapid force development here trains something called rate coding. It’s how quickly your nervous system can recruit motor units. This directly—directly—improves your ability to respond to attacks (you know that sinking feeling when someone jumps and you’re stuck in molasses for two seconds? This fixes that), accelerate out of corners, generate power during brief, maximal efforts where races are actually won.
Real example: Track cyclists have been using this exact protocol for years. The explosive component prepares the neuromuscular system for sprint starts where power output exceeds 2000 watts in the first 2-3 seconds. Road cyclists see benefits in responsive acceleration during crits and breakaway attempts—those moments where half a second of hesitation means you’re chasing for the next 20 minutes.
Strategy 3: Eccentric Emphasis—Build Tendon Resilience (And Stop Getting Injured)
What cyclists get backwards: Most focus exclusively on the concentric (pushing) phase of movements because that’s what happens during pedaling, right? They completely ignore eccentric strength… then wonder why they develop Achilles tendinopathy, patellar tendinitis, quad strains. I see it constantly. The confusion on their faces when their Achilles starts barking after a big training block.
The smarter approach: Systematically overload the lengthening phase of movements.
Heavy Seated Calf Raise (slow eccentrics)
Specifically—and I mean specifically—addresses the Achilles-soleus complex. Cyclists generate force through the forefoot during the power phase of the pedal stroke (that makes sense to everyone), but the calf-Achilles unit must also control and stabilize during the recovery phase and through transitions. It’s not passive. It’s working the entire time, and if it’s not strong enough to handle eccentric loads… pop. Or more likely, chronic degeneration that sidelines you for months.
Program it like this:
- 4-5 second eccentric lowering (count it out, don’t rush)
- 1 second pause at bottom
- 70-85% of 1RM for 8-12 reps
- 2-3 sets per session
- 1-2x weekly year-round—this is injury prevention, not seasonal
This tempo builds tendon stiffness. Which sounds bad but it’s actually good for cyclists. Stiffer tendons improve force transmission from muscle to pedal—it’s like having less slop in your drivetrain. Studies show 5-8% improvements in cycling economy after just 12 weeks of heavy eccentric calf training. That’s massive. That’s the difference between getting dropped and staying in the group.
Slant Board Squats (slow tempo)
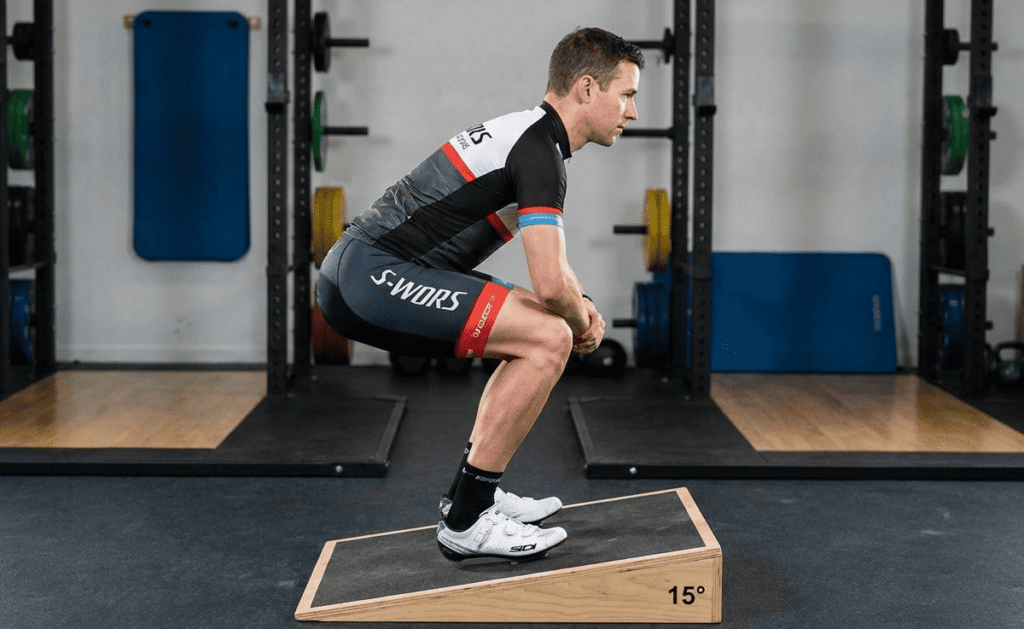
Apply the same principle to the entire lower kinetic chain. The 5-second eccentric on a 10-15° slant increases time under tension in the quadriceps (which need it—cyclists have notoriously underdeveloped quads relative to their cardiovascular capacity) while the board angle reduces stress on the Achilles during the bottom position. This is clever because it allows you to accumulate quad volume without aggravating ankle limitations that many cyclists have from literally thousands of hours in a fixed dorsiflexion position on the bike.
Programming:
- 3-4 sets of 8-10 reps
- 5 seconds down, 1 second pause, 2 seconds up (the tempo matters—don’t speed it up when it gets hard)
- Load at 60-70% of your flat-ground squat max
- Implement during base and build phases
The combination of these two eccentric-focused movements? It reduces injury risk while simultaneously improving force production. You’re not just stronger, you’re more durable. And durability wins stage races, wins seasons, wins careers.
Strategy 4: Isometric Strength at End-Range—Fix Your Dead Spot
The mistake: Most leg strength cycling programs completely ignore the bottom of the pedal stroke (150-210° if we’re being technical). Cyclists produce minimal power here—often just “unweighting” the pedal, hoping the other leg picks up the slack. This creates a dead spot that limits overall power output and requires the dominant leg to work harder during its power phase, which creates imbalances, which creates injuries… it’s a cascade.
The fix: Build strength-endurance at disadvantaged ankle positions.
Ankle Isometric Holds on Leg Press (mid-foot)

It targets exactly this problem. By positioning the foot at mid-foot contact—not heel, not ball of foot, but middle—you force the ankle into slight dorsiflexion while maintaining tension throughout the entire lower leg. This mimics (pretty accurately, actually) the position at the bottom of the pedal stroke where most cyclists are just passengers.
Programming:
- 4-6 holds per leg
- 20-40 seconds per hold (this will burn, embrace it)
- Moderate load: 50-60% of single-leg press max
- Rest 60-90 seconds between holds
- 1-2x weekly during base phase
This exercise accomplishes three things at once: strengthens the often-neglected tibialis anterior and peroneals (which control ankle stability and prevent rolling), improves ankle stability across the full pedal stroke, and builds neural efficiency in positions where you’re biomechanically disadvantaged.
After 8 weeks of isometric ankle work, cyclists report—and I’ve heard this repeatedly—smoother pedal strokes and reduced “clunking” sensation through the bottom of the revolution. Power meter data confirms this. The valley in the power curve from 150-210° becomes less pronounced, indicating better force application throughout the entire cycle. It’s like upgrading from a square wheel to a round one.
Strategy 5: Strategic Periodization—Stop Doing the Same Workout Year-Round
The mistake that kills progress: Hitting the gym with the same workout every single week, year-round. January? Same workout. July during peak race season? Same workout. This is insane. Strength training should evolve with your cycling training phases—they should work together, not against each other. Doing heavy strength work during peak race season compromises recovery (you can’t recover from racing AND heavy squats). Avoiding the gym during base season wastes your best opportunity to build foundational strength when you’ve actually got the recovery capacity.
The intelligent approach: Phase-specific exercise selection and loading that aligns with your calendar.
Off-Season/Base Phase (12-16 weeks)
This is when you build the foundation. Your bike volume is lower, intensity is lower (mostly Zone 2 work), so you can handle more gym stress.
- Ankle Isometric Holds: 2x weekly, 4-6 sets
- Single-Leg Leg Press with Pause: 2x weekly, 3-4 sets, heavier loads (75-85%)
- Slant Board Squats: 2x weekly, 3-4 sets
- Heavy Seated Calf Raise: 2x weekly, 4 sets
- Split-Stance Trap Bar Deadlift: 1x weekly, moderate speed
Focus here is maximum strength development, tendon conditioning, addressing imbalances before they become injuries. Gym sessions run 45-60 minutes, 2-3x weekly. This won’t interfere with base miles at Zone 2 intensity—different energy systems, different adaptations.
Build Phase (8-12 weeks)
Now you’re adding intensity on the bike. Sweet spot intervals, threshold work, some VO2max. Gym volume needs to drop.
- Reduce volume by 30-40% across the board
- Shift Split-Stance Trap Bar to 2x weekly, emphasize explosive speed (this is where you convert that strength to power)
- Single-Leg Press: maintain but reduce to 2-3 sets, focus on quality over quantity
- Slant Board Squats: 1x weekly as maintenance
- Calf Raises: continue for injury prevention (don’t skip this)
Focus: Convert that maximum strength you built into cycling-specific power. Gym sessions: 30-40 minutes, 2x weekly.
Peak/Race Phase (variable)
You’re racing. Recovery is premium currency. The gym is maintenance only.
- Single-Leg Press: 1x weekly, 2 sets, maintenance loads
- Split-Stance Trap Bar: 1x weekly, 3-4 sets, maximum velocity (keep the nervous system sharp)
- Calf Raises: continue if no Achilles issues
Focus: Maintain strength gains without compromising recovery for races and key workouts. Gym sessions: 20-30 minutes, 1x weekly. That’s it.
This phased approach—and I’ve seen this work over and over—delivered results for Alex Morrison, a masters criterium racer: “I used to do random gym work whenever I felt like it. Felt strong, thought I was being productive. Once I periodized strength training around my race calendar—heavy work November through January, explosive work February through April, maintenance during race season—my spring power numbers jumped 40 watts at threshold. 40 watts. And I stopped getting dropped on those punchy climbs that used to destroy me.”
Implementation Protocol: Your First 4 Weeks (Stop Overthinking, Start Here)
Week 1-2: Learn the movement patterns. Use bodyweight or minimal load. This feels stupid and boring but it’s critical—perfect the 2-3 second pause on single-leg press, practice explosive intent on trap bar deadlifts with just the empty bar, nail that 5-second eccentric tempo on slant squats. Video yourself. Watch it back. Fix what looks wrong.
Week 3-4: Add load progressively—5-10% increase weekly. Hit the prescribed rep ranges. Monitor recovery closely: if leg fatigue interferes with your key bike workouts (and you’ll know because you’ll miss power targets), reduce gym volume by 20-30% immediately. The bike is priority. The gym serves the bike.
Frequency: 2 sessions weekly, separated by 72+ hours minimum. Never—and I mean never—the day before hard intervals or races.
Session structure:
- Warm-up: 5-10 minutes easy spinning or rowing (get tissue temperature up)
- Power work (trap bar): 4-6 sets first while you’re fresh
- Strength work (single-leg press, slant squats): 3-4 sets each
- Injury prevention (calf raises, ankle isometrics): 2-3 sets each at the end
- Total time: 45-55 minutes
Track these metrics obsessively:
- Loads used for each exercise (progressive overload matters)
- Perceived effort during key bike workouts (are you recovering?)
- FTP tests every 6-8 weeks (this is your objective measure)
- Any joint pain or excessive soreness (warning signs)
Adjust based on data, not feelings. If FTP increases and you’re recovering adequately… you’re on track. Keep going. If bike performance suffers, reduce gym volume before you reduce cycling volume. Always.
The Bottom Line (And Why This Actually Matters)
Leg strength cycling isn’t about becoming a bodybuilder. It’s not about aesthetics or Instagram posts or how much you can squat. It’s about targeted adaptations that make you faster, more powerful, and more resilient on the bike where it actually counts—in races, on climbs, in that decisive moment when the group splits and you either go with it or you don’t.
These five exercises—when applied with proper periodization, appropriate loading, and attention to cycling-specific angles and velocities—compress what would normally take 12-18 months of generic strength training into 16-24 weeks of focused development. That’s the difference between incremental improvement and breakthrough performance.
The riders who win? They’re not necessarily the ones who suffer most (though they suffer plenty). They’re the ones who train smartest. Who eliminate wasted effort. Who understand that every training stimulus should serve a specific purpose.
These techniques eliminate waste. They accelerate results. They work.
Your move: Choose your current training phase right now. Implement the corresponding protocol from Strategy 5. Execute for 8 weeks without deviation—no modifications, no “I know my body better” adjustments. Test your FTP at the end. Look at the data. Adjust if needed, but commit to the process first.
The gap between you and the riders ahead? It closes one strategic rep at a time. Get in the gym. Apply these principles. Watch your power numbers climb.
And then go race your bike.
Before you do , check our full Cycling Training’s Guide for more tips and informations !